Tuesday, 31 May 2011
Cloudy Weather
This weather is getting ridiculous. I never would had guessed it could be cloudy for so long. Again tonight just as it gets dark the clouds will descend from the north-west, and make even collimating difficult. At this rate its going to be years before I make a dent in the list of Messier objects. Patience...
Monday, 16 May 2011
M57 - The Ring Nebula, 3x120 second

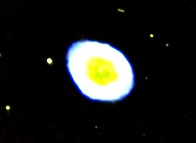 Having stacked the image I decided to crop it very close to the centre, and then played about more with the deconvolution settings in MaximDL. It brings out a little more detail and contrast in the (relatively) hot centre of the nebula, and the cooler outer regions, but as this is a raw single-shot colour based image with only a light pollution filter, not much detail of the nebula comes through. Can't wait to start using hydrogen-alpha and combining that data, but the telescope and camera are not suited to such small objects - the resolution falls off a cliff when zoomed in to this level. However, given the time of year, weather, and other limiting factors, I have had no choice but to image objects that are unsuitable for my set up. It is a good learning experience though...
For a much better idea of what I could be producing if someone gave me half a billion dollars, or a few hours with the HST, see here.
Sunday, 15 May 2011
M56 with C8, 9x100s, Calibration, Stack and Process

Cleaning Telescope, Optics, Required
I noticed donuts on the optics tonight. Not cleaned for a while, so will be out with the alcohol and wipes tomorrow... A few 300s exposures also had the donuts visible in the frames, which must mean serious dirt and serious cleaning...
M56 Calibration Frames
Capturing calibration frames as planned. Wow, did it get bright early! At 3.50am the sky was blue in the east, which was too bright to continue imaging, so covered the scope and took dark frames.
 |
| Unfortunately I didn't buy the 250 quid Pink Floyd tickets I was offered.... |
M56 Capture
Not sure if I will get enough subs / data / frames / pictures / time, but I'm doing 100s frames and we will see when the clouds intervene. M56 is much fainter than my previous targets so will be more demanding. Guiding is already a problem...
 Guiding is erratic - it may be the wind...


It seems however good the guiding, the stars always turn out egg-shaped.
Saturday, 14 May 2011
Sky Survey
Just been reading about Nick Risinger's exploits travelling the world to take pictures of the entire view of the sky from earth. Fascinating story, especially for those of us interested in astrophotography, and truly amazing results. "The Photopic Sky Survey is a 5,000 megapixel photograph of the entire night sky stitched together from 37,440 exposures." Take a look at the final picture here, as well as a great interactive360.
Bad Astrophotos No.2 - M101
Another very early image created in April 2011 when I was learning how (not) to take flats and calibrate properly. The image has a hot spot in the centre and corners where the flat frames have not corrected the images, probably due to the camera being moved between the images and flats being taken.
 |
| M101 - 10 x 120s subs |
Even when I reprocessed the data and cropped the image, it is still pretty dreadful. Lesson learned: don't change the image train before all calibration frames are taken.
 |
| M101 restacked with different reference image, cropped and reprocessed |
Friday, 13 May 2011
Bad Astrophotos No.1 - M1 - Crab Nebula
 This was probably the 3rd ever object I tried to image, all of about 2 months ago. Looking back on it, the data I got was OK, but the calibration frames required to produce a decent end result were lacking. This image also shows poor collimation ("brightness" (bad calibration / CCD) is not centred), vignetting, lack of dark frames to remove the amp glow in the top left corner, the list goes on. I only wish I knew then what I know now... but that is the nature of astrophotography.
 Steep learning curve, and will do better next time. Main lesson: choose object carefully, ensure telescope is collimated proplerly, and get calibration frames right, and lots of them!
Thursday, 12 May 2011
The Ring - M57

Wednesday, 11 May 2011
Blooming CCD Camera
 |
| Computer says no blooming (after 300s) |
Lets try 600s.
This is pointless. If the camera can't do 10 minute exposures of a bright star without blooming, then I have really bought a dud. The guiding went AWOL during the exposure, so this will be interesting... PHD (guiding) has gone off the scale again, so I've left the last minute to the mount to guide.
 |
| Not what I expected, little zig-zags... |
M13, The Great Cluster in Hercules
 I took 50 flat frames, and used the 6 darks taken last night, as well as 50 bias frames, and calibrated and stacked 16 images (each 60 second exposures), and combined them in MaximDL to get this image. No other processing. The colour could be improved, as the data is there, but requires increasing the saturation. This would bring out the blues and reds in the stars better.
Setting Up for Flats
 C8 with cameras and cables (I always tidy the cables if I am going to image, but with the clouds, it wasn't necessary) The clouds have returned, as forecast, but I set up anyway as I needed to take some flats to enable calibration of the images I took yesterday of M13. I took care not to change focus, or to turn the camera, or make any other changes to the telescope. I have found the skyflats plugin for MaximDL written by John Winfield to be an excellent little tool for getting flats at dusk. The plug-in automatically adjusts exposure length to compensate for the declining brightness of the sky so the average ADU of the flats are within the range required (approximately 25,000 ADU for my QHY8L). |
 |
| C8 at Sunset |
I've left the telescope set up as there is a possibility that the clouds will clear at 11pm, and behind the strom front could be a window of opportunity... Until then I will process the shots of M13 I took last night.
Normal Guiding Service Resumed
A little less drift, but again, seeing conditions not ideal, so I am just happy to be imaging M13 again...


I've just noticed PHD was set to not guide on declination, so recalibrating with it set to north.
After getting enough data on M13, although it's late, M57 (the Rin Nebula in Lyra) came up into view, above the dirty grey zone of the horizon. This is one of the joys of imaging where an image seemingly so bland as a grey smudge, will turn into a beautiful nebula once enough data is captured. Yes, the grey smudge in the middle is what I am so excited about...

When I zoom in, this is what the camera is capturing, a planetary nebula 2,300 years from earth:

Once the image is processed, although it won't be nearly as good as the colour image below (from Stellarium), it's one of the personal rewards of astrophotography.

Below is one 120 second image converted to colour. No other processing... 

I wish I had more time to get more data, but as is often the case, M57 will have to wait for another day until I and my equipment can do it justice.
Apart from the odd blip, as below, (probably caused by "stiction" (static friction in the gears) - the CG-5 mount is reknowned for it), guiding has been good tonight, just a pity I have to close up shop... The clouds are due to descend for a few days however, so at least I have plenty of data to process.

Monday, 9 May 2011
Typical Night Imaging
As many people publish finished (calibrated, stacked and processed) images, I thought it would be more educational to show a screenshot of what I see when actually imaging (this is what I would like to have seen before I got into this time-consuming hobby). This is the part of astronomy that I enjoy the most, except perhaps that eureka moment when processing a series of images and teasing out the detail of an image that seemed invisible, but there have been very few of those so far...
The 2 monitors above show the guiding software (PHD) tracking a star while the imaging software below (MaximDL) controls the camera. The image in the bottom left is a raw CCD image of a 50 second exposure of M13 (The Great Cluster in Hercules), a globular cluster in the constellation of, you've guessed it, Hercules.
It's actually pretty pointless doing this imaging, as the "seeing" (the quality of the atmosphere) is so appalling that the resultant stacked image will be blurry and without definition or colour, but as I have just reattached my mount to the pier, I am checking to see how well it tracks or guides. As you can see from the red line on the graph the telescope is drifting away from the target. This tells me my polar alignment is not very good, but probably adequate for such short exposures, especially when I'm going to delete all of the images.
I was going to image M101 tonight, but this happened:
No, not the satellite track across the image. Look closer, follow the arrow before the satellite track, and the bright spot is the core of M101, a spiral galaxy (that is usually readily visible after a 120 second exposure, which is what this is):
It's barely visible, which tells me the "seeing" is rubbish. It's hazy, misty, and the pollution (dust and particulates rather than light pollution) reduces the amount of light getting to the telescope from the object. So it's simply not worth trying to image anything faint. Hence I turned to M13 (which happens a lot). The other globular clusters, which I have become all too familiar with, are M3, M5, M92.... see for yourself - this is how I find them (there are many, many, more than this, and Charles Messier only catalogued the most visible ones):
 |
| PHD Guiding (above) and MaximDL Image Capture |
It's actually pretty pointless doing this imaging, as the "seeing" (the quality of the atmosphere) is so appalling that the resultant stacked image will be blurry and without definition or colour, but as I have just reattached my mount to the pier, I am checking to see how well it tracks or guides. As you can see from the red line on the graph the telescope is drifting away from the target. This tells me my polar alignment is not very good, but probably adequate for such short exposures, especially when I'm going to delete all of the images.
I was going to image M101 tonight, but this happened:
 |
| Satellite Track Ruins Image |
 |
| Closer look shows M101 hidden behind mist, cloud and poor seeing |
 |
| Globular Clusters on Chart |
Here is a zoomed raw image of M13 hot off the CCD chip (or rather cold off the CCD chip, as it's presently running at -20 degrees celsius):
 | |
| Close up of (cloud covered) raw image of M13 |
Not too good? A few moments later, this:
 | |
| Same close up, but less cloud |
Same exposure, only about 5 minutes later. Maybe the clouds are passing... This is more like what I would expect - much better definition of individual stars near the core of the cluster.
In case you're wondering about my guiding graph, yes, the drift continues:
 |
| Red line (declination axis) continues to drift |
However, the clouds have improved, and definition in the images is improving... So out comes the adjustable spanner, half a turn on the declination axis to flatten the red line.... and:
Whoops, wrong way (graph goes down even steeper (far right of red line)):
 |
| User error - excessive use of spanner in wrong direction... |
To cut a long story short (and one which will be told in future) I messed up my guiding big time, just by turning that bolt half a turn. Another 20 minutes later, the graph looks like like this:
 |
| What you guiding graph should not look like |
By which time it is time the clouds have returned. I eat, do a few chores, get ready to pack up, and loh, there is a gap in the clouds. I try to guide again, but it's so late, the telescope has slewed over the meridian... Time to call it a night.
My Telecope - Celestron C8 Schmidt-Cassegrain Telescope (SCT)
There are 3 main groups of optical telescopes - refractors (the oldest type, as used by Sir Isaac Newton), reflectors, and catadioptrics. (For more detail see this excellent wikipedia page). The SCT is one of the latter types, and I chose this because of the size and aperture. Basically, the greater the aperture (light gathering ability), the greater the number of objects that can be seen. I went for an 8 inch based on a simple price to performance equation: this is how much I wanted to pay, and this is the performance I got. For the same aperture, refractors are vastly more expensive. The big downsides to getting a larger scope (apart from cost obviously) are portability, size, and attachments - the bigger your scope, the bigger the other attachments (eyepieces, filters, etc.) seem to need to be (at least to compliment the scope, or to not become the limiting factor in its use), and consequently the greater the cost. The 8 inch version was a happy medium for me - 6 inches seemed too small - I felt like I could have picked it up and run with it, and worried I would regret not getting something bigger, but the 9.25 and 12 inch versions induced mumblings of, "what a beast" "where will I hide that from the wife - I couldn't even get it in the garden shed". So the 203mm C8 was a compromise of reasonable aperture, performance, portability, and cost. It still feels like a good price to me, and is probably why Celestron have sold so many of these pieces of kit. They are really popular, and I can see why.

Would I buy it again? Maybe. I'm still relatively new to this, and the only other scope I've really looked through is a cheap 80mm refractor (pictured above attached to my C8, which I'm using as a guide scope), so I haven't got much to compare, or got the best out of it yet, but so far it's been money well spent, and the optical tube is certainly fantastic; the detail I saw on the moon in the first week was gobsmacking. Yes, I literally spent a week looking at the moon awestruck.
Seeing Saturn and rings with your own eyes for the first time is also a memorable experience. More distant, smaller or fainter objects ("faint fuzzies") take more skill, such as good polar alignment and averted vision, to get the best out of the scope, and you own eyes, but the C8 delivers in spades if you give it time to learn it's nuances.
The mount (CG-5) I have my doubts about - more on that later, but suffice it to say that for Goto functionality (slewing to objects in the database) it's great, but for long exposure astrophotography, you will be battling the mount, as much as all the other things that have to be just right.
I read a huge amount before shelling out my hard-earned on the scope, and one of the best sources of information I came across was this site by Ted Kurkowski. Some of the content (for example on models, software and technology) is quite dated, but the guys knowledge and experience shines through. One of the great tips I picked up was to cut a disk with a hole over it and place it over the focuser, to enable finer control of focussing - always a tricky thing, especially with the standard focus knobs supplied on most scopes, and especially the C8. I cut a hole in an old plastic credit card sized rectangle (it was in fact a National Trust Membership card) and slotted it over the focussing knob. Not only was fine control much better, but it also reduced vibrations induced by touching the scope.
The first few accessories I bought were a moon filter (good for viewing when the moon is near full) and a Neodyniun "light pollition" filter (don't bother).
Next was adapting an old webcam I had lying around to enable me to take stills and video of the moon. Then USB cables to connect the mount to my laptop, so I could control it whilst sitting at my kitchen table, and not have to be out in the cold. When it was minus 6 degrees every night, this became a neccessty...
After about 6 weeks of being a telescope owner, I went a bit mad and spent the same amount as I had on the scope and mount, on a focal reducer, guide scope, guide camera, and CCD camera. Yes, I had really caught the bug, and my bank statements are the proof. But if I wanted to take long exposure shots, I need a camera that could do this, and the focal reducer to increase the speed (and reduce the f number from f/10 to f/6.3, and reduce the focal length (from approximately 2000mm to 1400mm), thereby reducing the required exposure time by a factor of 3. For long exposures I also needed a guide scope and camera to keep the telescope tracking my target objects.
Looks neat doesn't it?

Note the above picture includes the Celestron C8, with 80mm Skywatcher piggybacked on top as a guide scope (without eyepiece or camera attached). The red cap on the end of the C8 covers the focal reducer and extender - it is here the CCD camera goes. Just the other side of the focal reducer is the focusser (it was a standard focussing knob, but I replaced it with a feathertouch focuser and stepper motor). The above picture also does not conain cameras or the plethora of cables requires to power and operate the mount, focussing and cameras.
First Astrophoto
It's took me 6 weeks from getting my telescope in late January 2011, and a few weeks later a new QHY8L camera, to produce a reasonable astrophotograph.
During this time, I did a lot of reading about polar alignment, light pollution, exposures, guiding, set up, and all the other skills required for astronomy and astrophotography. I learnt it all from practically zero knowledge beforehand, and it has been a difficult but very rewarding experience.
It was only on Monday 7th March that the skies were clear enough in London for me to take 20 or so images of this globular cluster (M3), which I then processed and stacked in MaximDL.
Even 3 months ago I never would of thought I'd be taking images of globular clusters in the freezing cold March weather. It's an addicitive pastime that has grown on me very quickly.
More about my telescope and setup in the next post, but briefly:
Celestron 8 inch telescope - C8 SCT XLT on CG-5 Mount
f/6.3 reducer / Astronomik CLS-CCD filter / QHY8L camera
20 x 60s stacked in Maxim, curves and levels in Photoshop
Guided on PHD (although possibly not required on such short exposures if my polar alignment was any good!)
The main lesson I have learned, apart from the huge amount of patience required, is that you have to choose your target carefully, and then set up everything for the evening with this in mind. For the first few nights out I often took few images of very many different objects, and for astrophotography this is absolutely no good, as a lot of data (images) are required to get the desired end result. Images are processed and stacked to reduce noise and increase signal.
 |
| M3 Globular Cluster - 20 x 60s exposures taken with a C8 SCT. Darks and bias frames, but no flats |
It's took me 6 weeks from getting my telescope in late January 2011, and a few weeks later a new QHY8L camera, to produce a reasonable astrophotograph.
During this time, I did a lot of reading about polar alignment, light pollution, exposures, guiding, set up, and all the other skills required for astronomy and astrophotography. I learnt it all from practically zero knowledge beforehand, and it has been a difficult but very rewarding experience.
It was only on Monday 7th March that the skies were clear enough in London for me to take 20 or so images of this globular cluster (M3), which I then processed and stacked in MaximDL.
Even 3 months ago I never would of thought I'd be taking images of globular clusters in the freezing cold March weather. It's an addicitive pastime that has grown on me very quickly.
More about my telescope and setup in the next post, but briefly:
Celestron 8 inch telescope - C8 SCT XLT on CG-5 Mount
f/6.3 reducer / Astronomik CLS-CCD filter / QHY8L camera
20 x 60s stacked in Maxim, curves and levels in Photoshop
Guided on PHD (although possibly not required on such short exposures if my polar alignment was any good!)
The main lesson I have learned, apart from the huge amount of patience required, is that you have to choose your target carefully, and then set up everything for the evening with this in mind. For the first few nights out I often took few images of very many different objects, and for astrophotography this is absolutely no good, as a lot of data (images) are required to get the desired end result. Images are processed and stacked to reduce noise and increase signal.
Subscribe to:
Comments (Atom)